Customising Item Display
Text displayed for items and their selection messages can be configured.
| Text | Default | Custom Option |
|---|---|---|
| Labels for items | The id value of the item. | Item Label Template - uses the same format as summary templates for Transsend templates and can reference any fields in the template used for items in the list. |
| Item selected Message | The id value of the selected item. | Item Selected Template - uses the same format as summary templates for Transsend templates and can reference any fields in the template used for items in the list. |
| Summary line for selected item | The summary format of the template used for items from the list | Summary Template - uses the same format as summary templates for Transsend templates and can reference any fields in the template used for items in the list. |
| Message shown when no list item has been selected | ‘No Item Selected’ | No Selection Message - plain string message to indicate no item from the list is selected. |
Selecting Items From The List In A Message
There are two main ways to select items from the list: single and multiple selection.
Single Selection
To select a single item from a list add a ‘List Item’ field to the desired Card and select the associated List to use for the items to choose from. The user can then use this field to select a single item from the list.
Multiple Selection
To enable selection of multiple items add a ‘List Item’ field to a non root template and use that as the Child Template for a List Card inside the main Template. When the user adds an item to the List Card they will first be taken to the associated list to choose their item.
Combining Lists With Other Messages
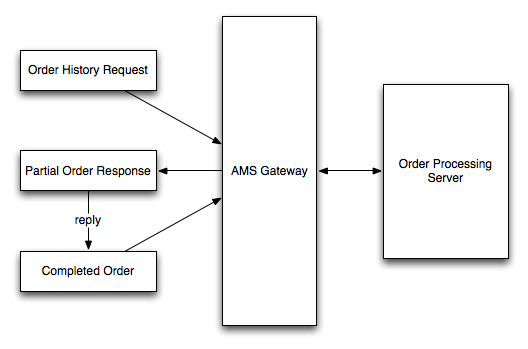
Whilst it is possible to add list data items to a message, as in the case of the stock order above, doing this for a large number of items could be time consuming. However, if we instead sent a partially completed stock order to the device and then only required the user to add or remove extra or unwanted items, the process could be completed quickly.
In this order scenario a sales rep is visiting a client and needs to place an order. The rep creates a new customer order history message. This message uses a template that allows a user to enter a customer’s details and select whether they want the last order or a recurring base order to be sent back to the phone. When this message is sent it is routed to the sale rep’s company server where it processes the request and sends back a stock order message containing either the items ordered last time or a set of items that are regularly ordered. The rep can then reply to this message and adjust the quantities of items, remove unwanted items and add extra ones much more quickly than creating a new order from the start.

Assigning Lists To Mobile Accounts
There are two ways to assign a List to a Mobile Account :
- Edit the Mobile Account directly and assign manually like you would a Template
- Use a Tag for automatic assignment
When assigning a List to a Mobile Account it is not necessary to assign the Template used for the items in that List to the Mobile Account as well. This is handled automatically in the background by the server.
Filters
It is possible to filter a list on a per mobile account basis. This provides the ability for an organisation to manage one master list, but allow individual mobile accounts access to only a subset of the items. For example a Customer list filtered by Sales Region.
To filter a list requires two steps:
- Specify the value to filter on.
- Add a filter value(s) to match with in the mobile account’s settings.
Creating the Filter
In the data map definition for a list select the field to filter on in the Server Filter Field menu. The value for this field in a list item can be a single value or multiple values separated by commas.
Adding the Filter to the Mobile Account
Edit the mobile account for which the list filter is to be added. In the Lists section of the mobile account enter the value to match in the Filter column. To match multiple values, enter each one separated by commas (no spaces).
To disable filtering and received all items in the list enter ‘~all’ as the filter value.
If the list has no filter field defined then it is not possible to enter a server filter value in the mobile account for that list. When using multiple values for filter values any value that matches will mean the item is considered a match.
